1. 智能相册案例
前言
本课程通过Python+OpenCV+Dlib库,以通俗易懂的方式讲解如何快速搭建人脸识别系统,结合实际应用场景,让技术爱好者在短时间内掌握核心实现逻辑,适用于人脸比对、智能相册等轻量级场景。
在人脸识别领域,Python凭借其丰富的生态库成为首选开发语言。OpenCV作为计算机视觉领域的”瑞士军刀”,提供基础图像处理能力;Dlib库则以其精准的人脸检测和特征点提取算法著称,两者结合可快速实现轻量级人脸识别系统。
核心优势: 👇
- 开发效率高 :Python语法简洁
- 跨平台支持 :Windows/macOS/Linux无缝运行
- 资源占用低 :普通笔记本电脑即可流畅运行
- 扩展性强 : 可轻松接入深度学习模型提升精度
硬件要求 👇
- 普通笔记本电脑(CPU即可,无需GPU)
- 摄像头(内置/外接USB摄像头)
性能优化与实际应用建议
精度提升方案
- 模型选择:
- 轻量级场景:Dlib默认模型(68特征点)
- 高精度需求:使用ResNet-101特征提取模型
- 数据增强:
- 添加不同角度、光照条件的训练样本
- 使用OpenCV的cv2.equalizeHist()进行直方图均衡化
- 模型选择:
实时性优化
- 多线程处理
隐私保护方案
- 本地化处理:所有计算在设备端完成
- 数据加密:存储的特征向量使用AES加密
- 匿名化处理:不存储原始图像,仅保留特征向量
完整项目扩展方向
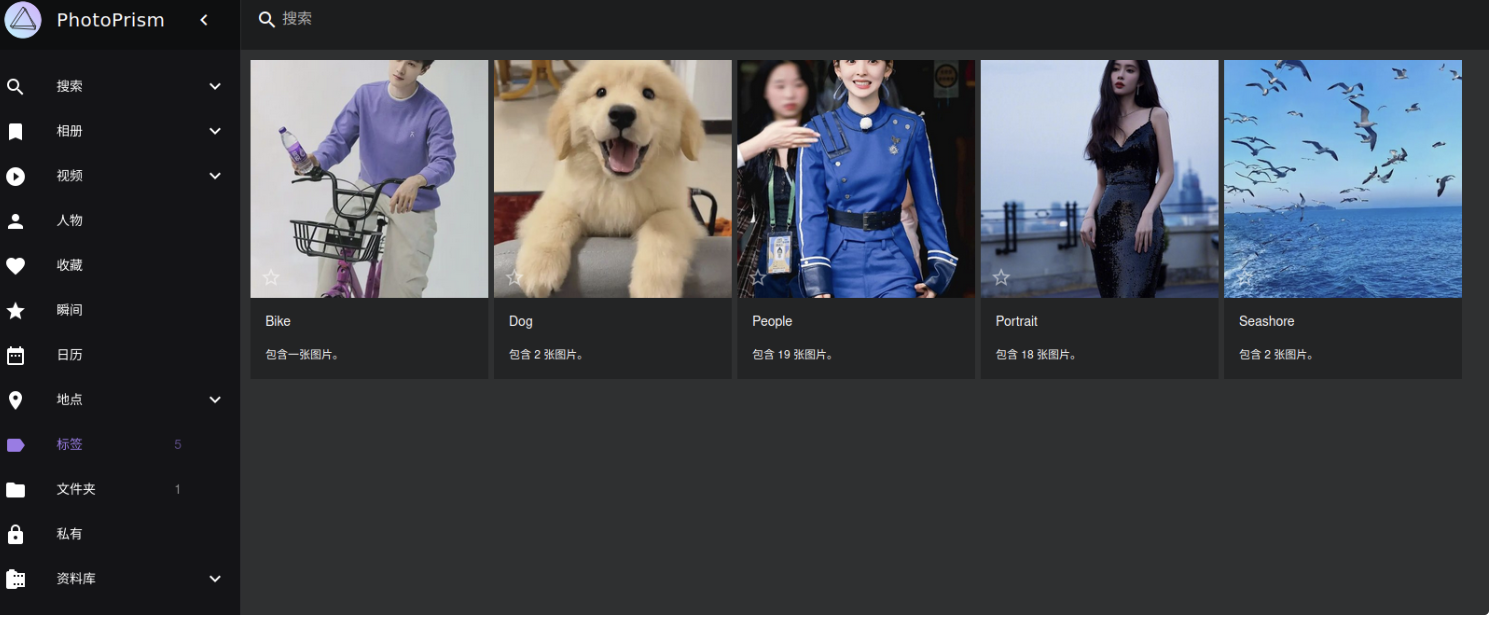
- 智能相册 :自动分类人物照片
- 门禁系统 :结合RFID实现双重验证
- 直播互动 :实时识别观众并显示信息
- 社交应用 :匹配相似面容的用户
2. 准备演示环境
前言
考虑到智能相册是一个新的项目,需要用到一些单独的库,所以我们需要创建一个新的虚拟环境,并安装这些库。
1. 创建虚拟环境
# 创建新的conda环境
conda create -n face_env python=3.12

# 激活新环境
conda activate face_env
# 查看conda中numpy的版本
conda list numpy
2. 安装numpy的1.26.4版本
因为需要用到dlib库,而dlib库需要numpy的1.26.4版本,所以我们需要安装这个版本。 如果numpy的版本2.x版本以上,则会报错。
错误: Unsupported image type, must be 8bit gray or RGB image
pip install numpy==1.26.4 -i https://pypi.tuna.tsinghua.edu.cn/simple/3. 安装dlib库
这里直接安装whl包,因为dlib库需要编译,所以安装起来比较麻烦。直接安装whl包,安装速度快很多。这里要注意的是版本和python版本要对应。
将dlib的whl包放到当前目录下
cd D:\javasoftware\jupyter_notebook

pip install dlib-19.24.2-cp312-cp312-win_amd64.whl执行结果 👇
(face_env) D:\javasoftware\jupyter_notebook>pip install dlib-19.24.2-cp312-cp312-win_amd64.whl
Looking in indexes: https://pypi.tuna.tsinghua.edu.cn/simple/
Processing d:\javasoftware\jupyter_notebook\dlib-19.24.2-cp312-cp312-win_amd64.whl
Installing collected packages: dlib
Successfully installed dlib-19.24.2
4. 安装face_recognition
pip install face_recognition -i https://pypi.tuna.tsinghua.edu.cn/simple/直接在控制台,输入
python -c "import dlib; print('dlib OK:', dlib.__version__)"

输出结果:

(face_env) D:\javasoftware\jupyter_notebook>python -c "import dlib; print('dlib OK:', dlib.__version__)"
dlib OK: 19.22.99

-------------------
python -c "import face_recognition; print('成功!')"


输出结果:
(face_env) D:\javasoftware\jupyter_notebook>python -c "import face_recognition; print('成功!')"
C:\Users\huyan\.conda\envs\face_env\lib\site-packages\face_recognition_models\__init__.py:7: UserWarning: pkg_resources is deprecated as an API. See https://setuptools.pypa.io/en/latest/pkg_resources.html. The pkg_resources package is slated for removal as early as 2025-11-30. Refrain from using this package or pin to Setuptools<81.
  from pkg_resources import resource_filename
成功!
这样dlib和face_recognition就安装成功了。 👍
5. 安装 opencv
pip install opencv-python -i https://pypi.tuna.tsinghua.edu.cn/simple


执行结果:

Installing collected packages: numpy, opencv-python
  Attempting uninstall: numpy
    Found existing installation: numpy 1.26.4
    Uninstalling numpy-1.26.4:
      Successfully uninstalled numpy-1.26.4
Successfully installed numpy-2.2.6 opencv-python-4.12.0.88
考虑到入门案例是在jupyter中执行,而python却又多个环境,因此需要配置一下,这样在jupyter中可以执行不同环境的python
6. 安装scipy
考虑到需要计算多张图片的欧式距离或者余弦相似度,因此需要安装scipy库。
pip install scipy -i https://pypi.tuna.tsinghua.edu.cn/simple/7.切换到face_env
安装ipykernel然后配置jupyter
conda install ipykernel -y
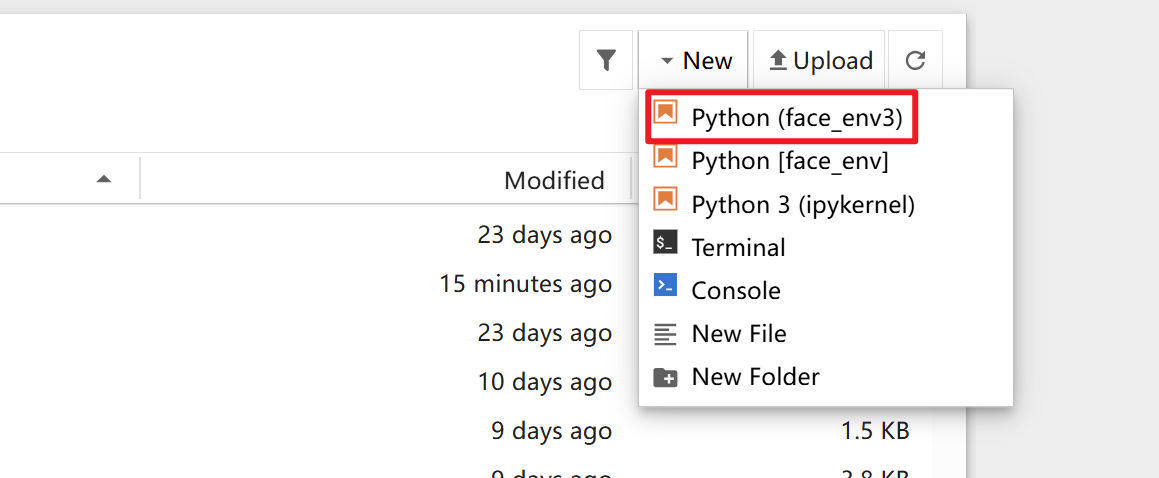
python -m ipykernel install --user --name=face_env --display-name="Python (face_env3)"
结果:
(face_env) D:\javasoftware\jupyter_notebook>python -m ipykernel install --user --name=face_env --display-name="Python (face_env2)"
Installed kernelspec face_env in C:\Users\huyan\AppData\Roaming\jupyter\kernels\face_env8.重启jupyter
然后在base环境下,重启jupyter
接着在juyter中新建一个face_env2的窗口,然后运行代码
import sys
print("当前Python路径:", sys.executable)


try:
    import dlib
    print("✅ dlib 导入成功!")
    print(f"版本: {dlib.__version__}")
except ImportError as e:
    print("❌ dlib 导入失败:", e)

try:
    import cv2
    print("✅ OpenCV 导入成功!")
    print(f"版本: {cv2.__version__}")
except ImportError as e:
    print("❌ OpenCV 导入失败:", e)


try:
    import face_recognition
    print("✅ face_recognition 导入成功!")
    print(f"版本: {face_recognition.__version__}")
except ImportError as e:
    print("❌ face_recognition 导入失败:", e)


import numpy as np
print("✅ numpy 导入成功!, 版本:", np.__version__)

import scipy
print("✅ scipy 导入成功!, 版本:", scipy.__version__)
运行结果如下:
当前Python路径: C:\Users\huyan\.conda\envs\face_env\python.exe
✅ dlib 导入成功!
版本: 19.24.2
✅ OpenCV 导入成功!
版本: 4.12.0
✅ face_recognition 导入成功!
版本: 1.2.3
✅ numpy 导入成功!, 版本: 1.26.4
✅ scipy 导入成功!, 版本: 1.16.3
至此,智能相册的环境就搭建好了。
总结
课堂作业
- 接下来参考上述笔记,完成环境的搭建吧!!!
3.入门案例之计算头像特征向量
前言
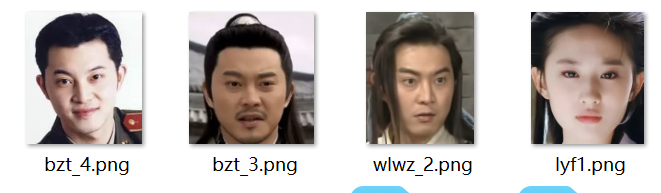
提前准备了一些素材,如上图,接下来我们要使用代码来判断上述的头像哪些是一个人
结合之前的知识,我们知道,每个图片其实有很多的特征,比如说脸部轮廓,脸部特征,眼睛,嘴巴,鼻子等,这些特征可以用来判断是否是同一个人。
我们可以使用下列模型来提取图片的特征:👇
核心区别对比表
| 特性 | shape_predictor_68_face_landmarks.dat | dlib_face_recognition_resnet_model_v1.dat |
|---|---|---|
| 主要功能 | 人脸关键点检测(68个点) | 人脸特征提取(128维向量) |
| 输出类型 | 68个坐标点 (x,y) | 128维特征向量 |
| 用途 | 人脸对齐、表情分析、姿态估计 | 人脸识别、身份验证、相似度比较 |
| 模型类型 | 回归模型(基于梯度提升树) | 深度卷积神经网络(ResNet) |
| 文件大小 | ~99MB | ~21MB |
| 计算复杂度 | 轻量级,实时性好 | 重量级,需要更多计算资源 |
接下来,我们通过代码,来获取图片的特征点 👇
import cv2
import dlib
import numpy as np

# 全局初始化
detector = dlib.get_frontal_face_detector()
predictor = dlib.shape_predictor("shape_predictor_68_face_landmarks.dat")
face_encoder = dlib.face_recognition_model_v1("dlib_face_recognition_resnet_model_v1.dat")

def get_face_descriptor_simple(image):
    """简化版的人脸特征提取"""
    # 转换为灰度图
    gray = cv2.cvtColor(image, cv2.COLOR_BGR2GRAY)

    # 检测人脸
    faces = detector(gray)
    if len(faces) == 0:
        print("未检测到人脸")
        return None

    # 获取第一个人脸的关键点
    face = faces[0]
    landmarks = predictor(gray, face)

    # 直接计算特征向量(最简单的方法)
    try:
        descriptor = face_encoder.compute_face_descriptor(image, landmarks)
        return np.array(descriptor)
    except Exception as e:
        print(f"特征提取失败: {e}")
        return None

# 使用示例
image = cv2.imread("./img/wlwz_1.jpg")
if image is not None:
    descriptor = get_face_descriptor_simple(image)
    if descriptor is not None:
        print(f"特征向量: {descriptor}")
        print(f"维度: {len(descriptor)}")
执行结果如下:
特征向量: [-0.09901384  0.06084055  0.09518617 -0.01652943 -0.09956563 -0.06009514
 -0.05349353 -0.18446989  0.0951305  -0.1438915   0.24305613 -0.11659423
 -0.22005761 -0.03766336 -0.03671002  0.16386276 -0.17960867 -0.16776177
 -0.03146591 -0.03416127  0.09595509 -0.00142866  0.05450143  0.01685444
 -0.11304282 -0.31755805 -0.15142575 -0.03759461  0.02362125 -0.02099258
 -0.05702737  0.05758868 -0.18815674 -0.06251988  0.07514404  0.10427305
  0.06773867 -0.09489121  0.15065114 -0.10552178 -0.2411577   0.00324028
  0.1104022   0.2463553   0.20803887  0.02466984 -0.0412521  -0.10724913
  0.12030857 -0.1401787   0.07784691  0.08251234  0.07116853  0.02590031
  0.03823002 -0.1257595   0.03639594  0.1314425  -0.14406417 -0.03723703
  0.1103488  -0.12473613  0.03568143 -0.11080319  0.19530822  0.08681834
 -0.06169293 -0.2670421   0.12140313 -0.17740625 -0.06460744  0.0800873
 -0.17194174 -0.09074571 -0.34515604 -0.0834927   0.40133366  0.05637208
 -0.16816802  0.10581298 -0.02747984  0.00891253  0.12799071  0.11276929
  0.02561116  0.08278474 -0.1611753  -0.02064909  0.26416376 -0.07561243
 -0.08188174  0.20567082 -0.04958564 -0.00558749  0.12305956  0.02822245
 -0.08096346 -0.00523363 -0.18786    -0.04048178 -0.0367902  -0.03623189
 -0.04573981  0.12128097 -0.17397331  0.0837979  -0.04232945  0.06772753
 -0.03290608 -0.05869365 -0.09395037 -0.04734237  0.1314203  -0.28596008
  0.10505223  0.12609904  0.04389891  0.12514588  0.05901205  0.08510734
 -0.03174388  0.00994665 -0.19689369 -0.0392978   0.07579797 -0.02261996
  0.12098389  0.05575238]
维度: 128
上面的一组数据,就是128个维度的特征向量,我们可以把它理解为一个128维的向量,这个向量可以用来表示一个人的特征,比如说脸部轮廓,脸部特征,眼睛,嘴巴,鼻子等。
那怎么来判断两个特征向量是否是同一个人呢?
我们可以使用欧氏距离来计算两个特征向量之间的距离,如果距离小于某个阈值,那么就可以认为这两个特征向量是同一个人。
那有哪些距离尼?
欧氏距离,曼哈顿距离,余弦相似度等,这里我们使用欧氏距离或者余弦相似度来计算两个特征向量之间的距离。
4.入门案例之对比2张头像是否是同一个人
前言
1.准备数据
2. 流程
图片1 ──┐
         ├─→ 人脸检测 → 关键点定位 → 特征提取 ──┐
图片2 ──┘                                        │
                                                ↓
                                        计算余弦相似度
                                                ↓
                                        判断是否为同一人


说明:为什么定位后特征提取?

不同输入 → 统一输出
┌─────────┐    ┌─────────┐    ┌─────────┐
│  小人脸  │    │  大人脸  │    │ 倾斜人脸 │
│         │    │         │    │         │
└─────────┘    └─────────┘    └─────────┘
     │              │              │
     └──────────────┼──────────────┘
                    ▼
            ┌─────────────────┐
            │ 标准化的128维特征│
            └─────────────────┘
2. 使用代码
import cv2
import dlib
import numpy as np
from scipy.spatial.distance import cosine

# 全局初始化
detector = dlib.get_frontal_face_detector() # 人脸检测器
predictor = dlib.shape_predictor("shape_predictor_68_face_landmarks.dat") # 人脸关键点检测器
face_encoder = dlib.face_recognition_model_v1("dlib_face_recognition_resnet_model_v1.dat") # 人脸特征提取器

def get_face_descriptor_simple(image):
    """简化版的人脸特征提取"""
    gray = cv2.cvtColor(image, cv2.COLOR_BGR2GRAY)
    faces = detector(gray)
    if len(faces) == 0:
        return None
    face = faces[0] # 取第一个人脸
    landmarks = predictor(gray, face) # 关键点定位
    descriptor = face_encoder.compute_face_descriptor(image, landmarks) # 特征提取
    return np.array(descriptor)

def compare_two_images(image_path1, image_path2):
    """比较两张图片并返回相似性分数"""

    # 加载图片
    img1 = cv2.imread(image_path1)
    img2 = cv2.imread(image_path2)

    if img1 is None or img2 is None:
        print("无法加载图片")
        return None

    # 提取特征
    desc1 = get_face_descriptor_simple(img1)
    desc2 = get_face_descriptor_simple(img2)

    if desc1 is None or desc2 is None:
        print("无法提取人脸特征")
        return None

    # 计算余弦相似度
    similarity = 1 - cosine(desc1, desc2) # 余弦相似度
    # 计算欧氏距离
    similarity2 = np.linalg.norm(desc1 - desc2)

    print(f"图片1: {image_path1}")
    print(f"图片2: {image_path2}")
    print(f"余弦相似度: {similarity:.4f}")
    print(f"欧氏距离: {similarity2:.4f}")
    print(f"是否为同一人: {'是' if similarity > 0.91 else '否'}")

    return similarity

# 使用示例
# similarity = compare_two_images("./img/wlwz_1.jpg", "./img/wlwz_2.png")
# similarity = compare_two_images("./img/wlwz_1.jpg", "./img/bzt_3.png")
# similarity = compare_two_images("./img/wlwz_1.jpg", "./img/bzt_4.png")
similarity = compare_two_images("./img/bzt_4.png", "./img/lyf1.png")
运行结果:
图片1: ./img/wlwz_1.jpg
图片2: ./img/bzt_3.png
余弦相似度: 0.9562
欧氏距离: 0.4182
是否为同一人: 是


图片1: ./img/bzt_4.png
图片2: ./img/lyf1.png
余弦相似度: 0.9036
欧氏距离: 0.6290
是否为同一人: 否

图片1: ./img/wlwz_1.jpg
图片2: ./img/bzt_4.png
余弦相似度: 0.9617
欧氏距离: 0.3980
是否为同一人: 是
5. 识别一张照片中的多个人脸
前言
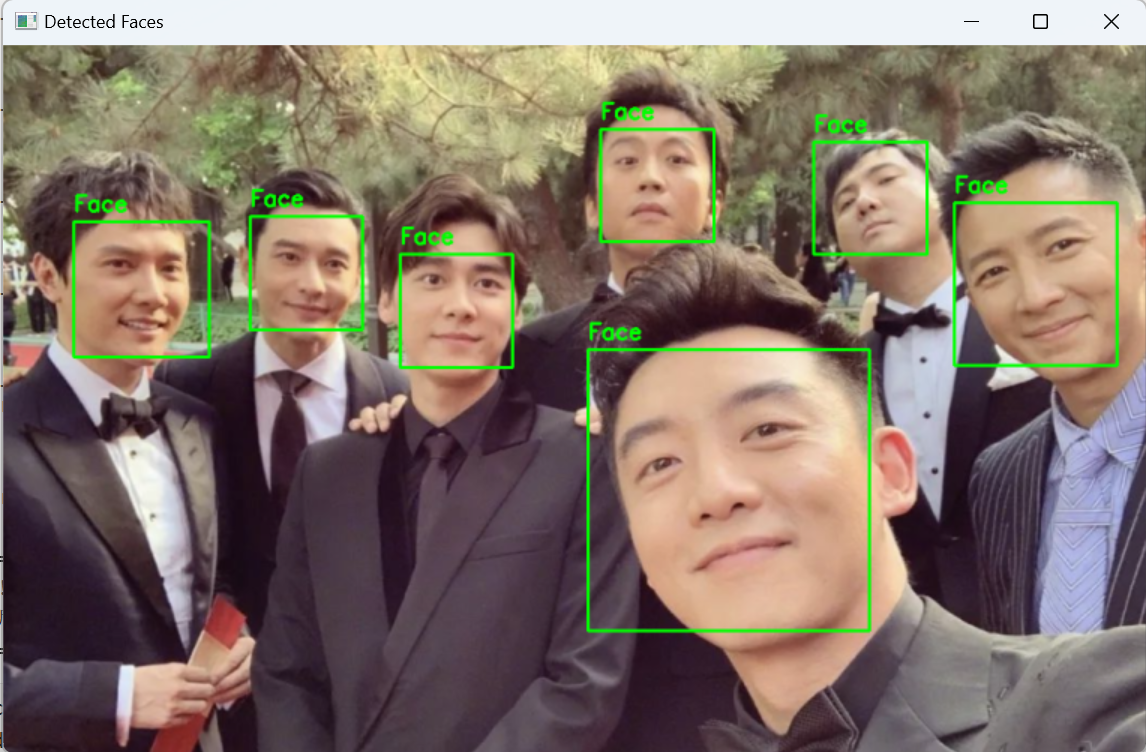
流程如下:👇
- 加载用户指定的图片。
- 使用 dlib检测器找到图片中所有的脸。
- 遍历每一个检测到的人脸,用一个绿色的矩形框把它标记出来。
- 在图片上显示检测结果,并等待用户按键关闭窗口。
- (可选)将标记好的图片保存到一个新的文件中。
import cv2
import dlib

# --- 全局初始化 (只需检测器即可) ---
# 确保 'shape_predictor_68_face_landmarks.dat' 文件路径正确
# 虽然画框不需要关键点,但初始化predictor是代码原有结构的一部分,我们保留它以避免错误
PREDICTOR_PATH = "shape_predictor_68_face_landmarks.dat"

try:
    detector = dlib.get_frontal_face_detector()
    # 尝试加载预测器,如果文件不存在则给出警告,但不影响主要功能
    predictor = dlib.shape_predictor(PREDICTOR_PATH)
    print("Dlib 模型加载成功。")
except Exception as e:
    print(f"加载 Dlib 模型时出错: {e}")
    print("人脸关键点检测功能可能不可用,但人脸检测功能正常。")
    detector = dlib.get_frontal_face_detector()
    predictor = None


def draw_green_boxes_on_image(image_path, save_result=False, output_path="output_marked.jpg"):
    """
    在指定图片上检测所有人脸,并用绿色框标记出来。

    参数:
    image_path (str): 要处理的图片路径。
    save_result (bool): 是否保存标记后的图片。默认为False。
    output_path (str): 如果save_result为True,结果图片的保存路径。
    """
    # 1. 加载图片
    image = cv2.imread(image_path)
    if image is None:
        print(f"错误:无法加载图片 '{image_path}'。请检查路径是否正确。")
        return

    # 创建一个原始图像的副本用于绘制,以免修改原图数据
    image_with_boxes = image.copy()

    # 2. 转为灰度图并进行人脸检测
    gray = cv2.cvtColor(image, cv2.COLOR_BGR2GRAY)
    # upsample_num_times=1 会对图片进行一次放大再检测,可以提高对小脸的检测率
    faces = detector(gray, upsample_num_times=1)

    print(f"在图片 '{image_path}' 中检测到 {len(faces)} 张人脸。")

    # 3. 遍历检测结果,并在图上画框
    for face in faces:
        # face 对象包含 left(), top(), right(), bottom() 方法来获取坐标
        x1, y1 = face.left(), face.top()
        x2, y2 = face.right(), face.bottom()

        # 定义绿色框的颜色 (B, G, R) 格式,所以绿色是 (0, 255, 0)
        color_green = (0, 255, 0)
        # 线条粗细设为 2
        thickness = 2

        # 画矩形框
        cv2.rectangle(image_with_boxes, (x1, y1), (x2, y2), color_green, thickness)

        # (可选) 在框上方显示 "Face" 文字
        cv2.putText(image_with_boxes, 'Face', (x1, y1-10), cv2.FONT_HERSHEY_SIMPLEX, 0.7, color_green, thickness)

    # 4. 显示结果
    # 先调整一下窗口大小,防止图片太大显示不全
    scale_percent = 70 # 缩放百分比
    width = int(image_with_boxes.shape[1] * scale_percent / 100)
    height = int(image_with_boxes.shape[0] * scale_percent / 100)
    dim = (width, height)
    resized_image = cv2.resize(image_with_boxes, dim, interpolation=cv2.INTER_AREA)

    cv2.imshow('Detected Faces', resized_image)
    print("按键盘上的任意键关闭预览窗口...")
    cv2.waitKey(0) # 等待用户按键
    cv2.destroyAllWindows() # 关闭所有OpenCV窗口

    # 5. (可选) 保存结果
    if save_result:
        cv2.imwrite(output_path, image_with_boxes)
        print(f"已保存标记后的图片至: {output_path}")


# --- 使用示例 ---
if __name__ == "__main__":
    # 在这里替换成你想要测试的图片路径
    # 例如,可以拿之前 ./img/photos/ 里的一张合照来测试
    test_image_path = "./photos/3.png" # <--- 修改这里!

    # 调用函数,并显示是否保存结果
    # 如果想保存,把 False 改成 True
    draw_green_boxes_on_image(test_image_path, save_result=True, output_path="./photos/temp_cropped_faces/detected_output.jpg")
6. 扫描文件夹下所有图片提取人物
前言
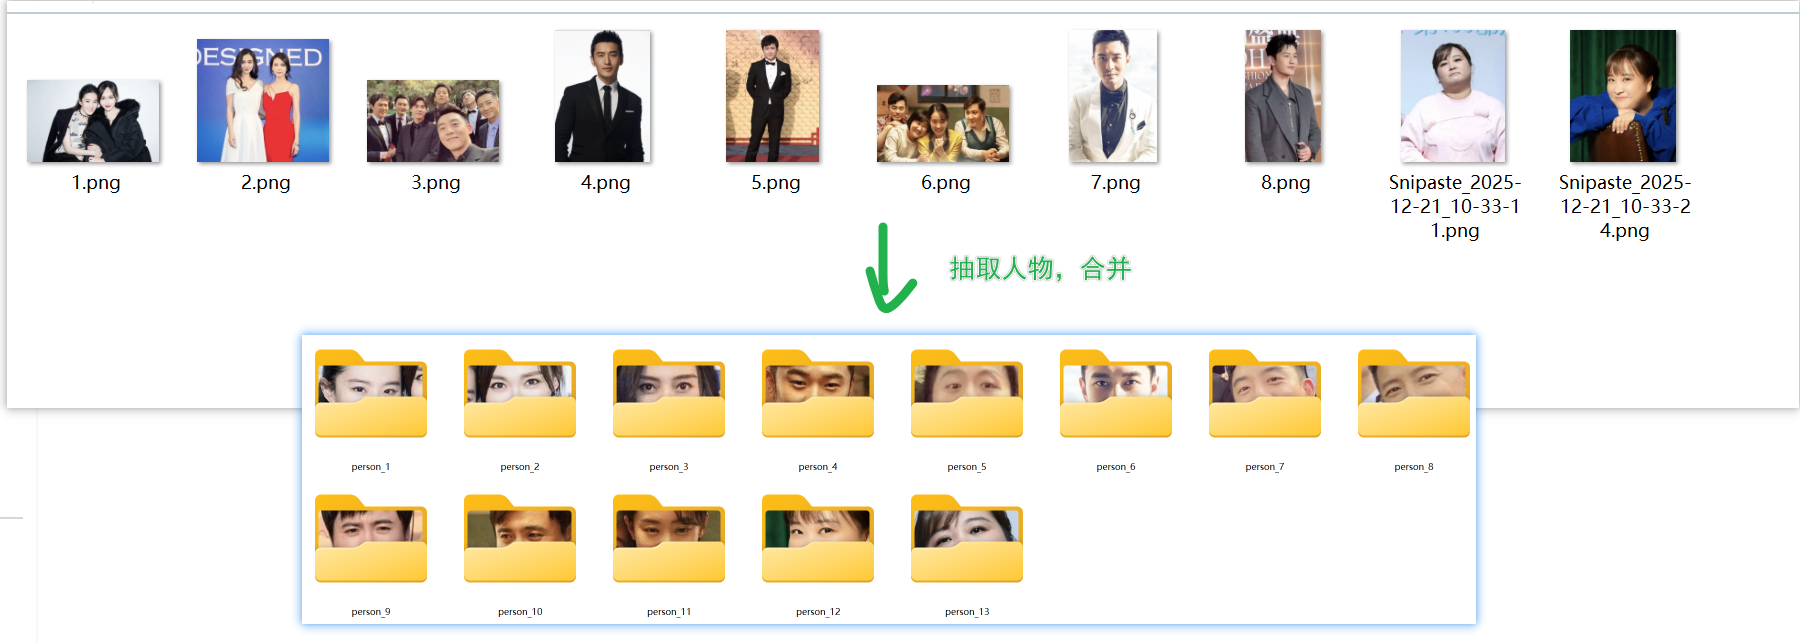
核心思路:
- 遍历文件夹:读取
./photos/下的所有图片。 - 遍历人脸:在 for filename in os.listdir(PHOTOS_DIR)的循环内部,当检测到人脸后,需要遍历 faces列表中的每一个 face对象。
- 独立处理:对每一个检测到的人脸 (face),都要独立地进行抠图、保存和特征提取,并将结果分别存入 all_face_data列表中。这意味着,一张有多个人脸的图片,可能会在 all_face_data中产生多个条目。
- 文件名唯一性:由于现在是从一张图中提取多张人脸,修改保存人脸的文件名生成逻辑,以确保每个被抠出的人脸都有唯一的文件名。我们可以通过添加索引来实现,例如 f"{base_name}face"。
import cv2
import dlib
import numpy as np
import os
import shutil
from scipy.spatial.distance import cosine

# --- 全局初始化 ---
# 确保所需的数据文件路径正确
PREDICTOR_PATH = "shape_predictor_68_face_landmarks.dat"
ENCODER_PATH = "dlib_face_recognition_resnet_model_v1.dat"

if not os.path.exists(PREDICTOR_PATH) or not os.path.exists(ENCODER_PATH):
    print(f"错误:请确保 '{PREDICTOR_PATH}' 和 '{ENCODER_PATH}' 文件存在于当前目录。")
else:
    detector = dlib.get_frontal_face_detector()
    predictor = dlib.shape_predictor(PREDICTOR_PATH)
    face_encoder = dlib.face_recognition_model_v1(ENCODER_PATH)


def get_face_descriptor(image):
    """从图像中获取第一个人脸的特征描述符"""
    if detector is None:
        return None
    gray = cv2.cvtColor(image, cv2.COLOR_BGR2GRAY)
    faces = detector(gray)
    if len(faces) == 0:
        return None
    face = faces[0]
    landmarks = predictor(gray, face)
    descriptor = face_encoder.compute_face_descriptor(image, landmarks)
    return np.array(descriptor)


def crop_and_save_face(image, face_rect, output_dir, base_filename_with_index):
    """根据人脸矩形框裁剪人脸并保存"""
    x, y, w, h = face_rect.left(), face_rect.top(), face_rect.width(), face_rect.height()

    # 扩大一点边界,让头像更好看
    padding = 0.2
    x_padded = max(0, int(x - w * padding))
    y_padded = max(0, int(y - h * padding))
    w_padded = min(image.shape[1] - x_padded, int(w * (1 + 2 * padding)))
    h_padded = min(image.shape[0] - y_padded, int(h * (1 + 2 * padding)))

    face_crop = image[y_padded:y_padded+h_padded, x_padded:x_padded+w_padded]

    if face_crop.size == 0:
        print(f"警告:无法从 {base_filename_with_index} 裁剪有效人脸区域。")
        return None

    # 保存裁剪后的人脸
    # 注意:这里直接使用传入的带索引的完整文件名
    face_path = os.path.join(output_dir, f"{base_filename_with_index}.jpg")
    cv2.imwrite(face_path, face_crop)
    print(f"已保存人脸: {face_path}")
    return face_path


def main():
    # --- 配置路径 ---
    PHOTOS_DIR = "./photos/"
    HEADIMG_DIR = "./photos/headimg/" # 总目录
    CROPPED_FACES_TEMP_DIR = "./photos/temp_cropped_faces/" # 临时存放抠出的人脸

    # --- 初始化目录 ---
    if not os.path.exists(PHOTOS_DIR):
        print(f"错误:图片源目录 '{PHOTOS_DIR}' 不存在!")
        return

    # 清理并创建临时和最终的目录
    if os.path.exists(CROPPED_FACES_TEMP_DIR):
        shutil.rmtree(CROPPED_FACES_TEMP_DIR)
    os.makedirs(CROPPED_FACES_TEMP_DIR, exist_ok=True)

    if os.path.exists(HEADIMG_DIR):
        shutil.rmtree(HEADIMG_DIR)
    os.makedirs(HEADIMG_DIR, exist_ok=True)

    # --- 步骤1 & 2: 扫描、抠图并提取特征 ---
    all_face_data = [] # 存储 {"path": "人脸路径", "descriptor": 特征值}

    print("\n--- 开始扫描和抠图 ---")
    supported_formats = ['.jpg', '.jpeg', '.png', '.bmp']
    for filename in os.listdir(PHOTOS_DIR):
        if any(filename.lower().endswith(fmt) for fmt in supported_formats):
            img_path = os.path.join(PHOTOS_DIR, filename)
            print(f"正在处理: {img_path}")

            image = cv2.imread(img_path)
            if image is None:
                print(f"警告:无法读取图片 {img_path},已跳过。")
                continue

            gray = cv2.cvtColor(image, cv2.COLOR_BGR2GRAY)
            faces = detector(gray)

            if len(faces) == 0:
                print(f"提示:在 {filename} 中未检测到人脸。")
                continue

            # ==== 核心改动点 ====
            # 遍历检测到的所有人脸
            base_name = os.path.splitext(filename)[0]
            for idx, face in enumerate(faces):
                # 生成唯一的文件名,例如 "my_photo_face_0", "my_photo_face_1"
                unique_face_filename = f"{base_name}_face_{idx}"

                # 抠图并保存,传入唯一文件名
                saved_face_path = crop_and_save_face(image, face, CROPPED_FACES_TEMP_DIR, unique_face_filename)

                if saved_face_path:
                    # 从保存的头像中提取特征
                    cropped_image = cv2.imread(saved_face_path)
                    descriptor = get_face_descriptor(cropped_image)
                    if descriptor is not None:
                        all_face_data.append({"path": saved_face_path, "descriptor": descriptor})
                    else:
                        print(f"警告:无法从 {saved_face_path} 提取人脸特征。")

    if not all_face_data:
        print("\n未能从任何图片中提取到有效的人脸特征。程序结束。")
        return

    print(f"\n共成功提取 {len(all_face_data)} 张人脸的特征。")

    # --- 步骤3: 根据相似度进行分组 (此部分逻辑不变) ---
    print("\n--- 开始根据相似度分组 ---")
    groups = [] # 存储分组,每个组是一个字典列表 [{"path": ..., "descriptor": ...}, ...]
    SIMILARITY_THRESHOLD = 0.95

    for face_data in all_face_data:
        current_descriptor = face_data["descriptor"]
        found_group = False

        for group in groups:
            representative_descriptor = group[0]["descriptor"]
            similarity = 1 - cosine(current_descriptor, representative_descriptor) # 余弦相似度

            if similarity > SIMILARITY_THRESHOLD: # 相似度大于阈值,则加入当前组
                group.append(face_data)
                found_group = True
                break

        if not found_group:
            groups.append([face_data])

    # --- 步骤4: 保存分组结果并输出 (此部分逻辑不变) ---
    print("\n--- 保存分组结果 ---")
    person_count = 0
    for i, group in enumerate(groups):
        person_count += 1
        person_folder_name = f"person_{person_count}"
        person_folder_path = os.path.join(HEADIMG_DIR, person_folder_name) # 最终保存的头像目录
        os.makedirs(person_folder_path, exist_ok=True)

        print(f"\n--- 人物 {person_count} (共 {len(group)} 张头像) ---")
        for face_info in group:
            filename = os.path.basename(face_info["path"])
            dest_path = os.path.join(person_folder_path, filename)
            shutil.move(face_info["path"], dest_path)
            print(f"  移动 {filename} -> {dest_path}")

    # --- 最终输出 ---
    print("\n======================================")
    print(f"处理完成!上述照片总共有 {person_count} 个人。")
    print(f"所有分类后的头像已保存至: {HEADIMG_DIR}")
    print("======================================")


if __name__ == "__main__":
    if detector is not None:
        main()
6. 安装PyQt5 UI界面库
前言
1. 在face_env环境中安装PyQt5
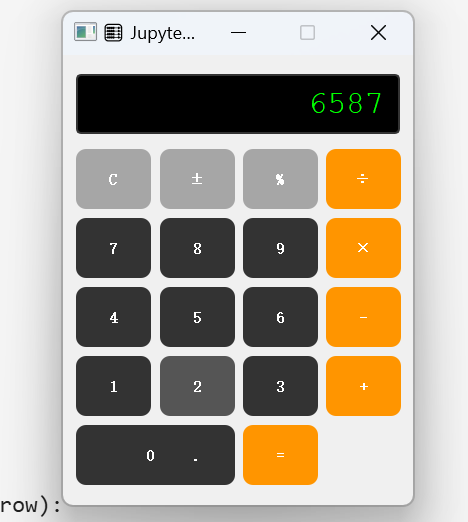
pip install PyQt52. 在Cell2中编写一个计算器
# 在第三个cell中运行 - 更实用的案例
import sys
from PyQt5.QtWidgets import (QApplication, QMainWindow, QWidget, QVBoxLayout,
                             QHBoxLayout, QPushButton, QLineEdit, QLabel,
                             QGridLayout, QMessageBox)
from PyQt5.QtCore import Qt
from PyQt5.QtGui import QFont
import threading

class CalculatorApp(QMainWindow):
    def __init__(self):
        super().__init__()
        self.initUI()

    def initUI(self):
        self.setWindowTitle('🧮 Jupyter计算器')
        self.setFixedSize(350, 450)

        # 中央窗口部件
        central_widget = QWidget()
        self.setCentralWidget(central_widget)

        # 主布局
        main_layout = QVBoxLayout()
        central_widget.setLayout(main_layout)

        # 显示屏
        self.display = QLineEdit()
        self.display.setAlignment(Qt.AlignRight)
        self.display.setReadOnly(True)
        self.display.setFixedHeight(60)
        self.display.setFont(QFont("Arial", 16))
        self.display.setStyleSheet("""
            QLineEdit {
                background-color: #000000;
                color: #00FF00;
                border: 2px solid #333333;
                border-radius: 5px;
                padding: 10px;
                font-family: 'Courier New';
            }
        """)
        self.display.setText("0")
        main_layout.addWidget(self.display)

        # 按钮网格
        button_layout = QGridLayout()
        main_layout.addLayout(button_layout)

        # 按钮定义
        buttons = [
            ['C', '±', '%', '÷'],
            ['7', '8', '9', '×'],
            ['4', '5', '6', '-'],
            ['1', '2', '3', '+'],
            ['0', '.', '=']
        ]

        # 创建按钮
        for row, button_row in enumerate(buttons):
            for col, button_text in enumerate(button_row):
                if button_text == '0':
                    # 0按钮占两列
                    btn = QPushButton(button_text)
                    btn.setFixedSize(150, 60)
                    button_layout.addWidget(btn, row, col, 1, 2)
                elif button_text == '=':
                    btn = QPushButton(button_text)
                    btn.setFixedSize(75, 60)
                    button_layout.addWidget(btn, row, col)
                else:
                    btn = QPushButton(button_text)
                    btn.setFixedSize(75, 60)
                    button_layout.addWidget(btn, row, col)

                # 设置按钮样式
                if button_text in ['C', '±', '%']:
                    color = "#A6A6A6"
                elif button_text in ['÷', '×', '-', '+', '=']:
                    color = "#FF9500"
                else:
                    color = "#333333"

                btn.setStyleSheet(f"""
                    QPushButton {{
                        background-color: {color};
                        color: white;
                        border: none;
                        border-radius: 10px;
                        font-size: 16px;
                        font-weight: bold;
                    }}
                    QPushButton:hover {{
                        background-color: {"#B8B8B8" if button_text in ['C', '±', '%'] else "#FFB143" if button_text in ['÷', '×', '-', '+', '='] else "#555555"};
                    }}
                    QPushButton:pressed {{
                        background-color: {"#999999" if button_text in ['C', '±', '%'] else "#CC7700" if button_text in ['÷', '×', '-', '+', '='] else "#222222"};
                    }}
                """)

                # 连接信号
                btn.clicked.connect(lambda checked, text=button_text: self.on_button_click(text))

    def on_button_click(self, text):
        """处理按钮点击事件"""
        current_text = self.display.text()

        if text == 'C':
            self.display.setText('0')
        elif text == '=':
            try:
                # 替换显示符号为Python运算符
                expression = current_text.replace('×', '*').replace('÷', '/')
                result = eval(expression)
                self.display.setText(str(result))
            except:
                self.display.setText('Error')
                QMessageBox.warning(self, '错误', '无效的表达式!')
        elif text in ['÷', '×', '-', '+']:
            if current_text != '0' and current_text[-1] not in ['÷', '×', '-', '+']:
                self.display.setText(current_text + f' {text} ')
        elif text == '±':
            if current_text != '0':
                if current_text.startswith('-'):
                    self.display.setText(current_text[1:])
                else:
                    self.display.setText('-' + current_text)
        elif text == '%':
            try:
                result = float(current_text) / 100
                self.display.setText(str(result))
            except:
                self.display.setText('Error')
        elif text == '.':
            if '.' not in current_text.split()[-1]:
                self.display.setText(current_text + '.')
        else:
            if current_text == '0':
                self.display.setText(text)
            else:
                self.display.setText(current_text + text)

def run_calculator():
    """运行计算器应用"""
    app = QApplication.instance()
    if app is None:
        app = QApplication(sys.argv)

    calculator = CalculatorApp()
    calculator.show()

    return app.exec_()

# 启动计算器
print("🚀 启动计算器应用...")
print("💡 这是一个功能完整的计算器,支持基本运算")
try:
    run_calculator()
except Exception as e:
    print(f"计算器已关闭: {e}")